
A couple of years ago, I saw an intriguing portrait created with smoke by South African artist, Diane Victor. Since it's warm enough to go outside and burn things on my front porch, today seemed like a good day to try fumage.
Fumage (from fumée—French for "smoke") was invented in 1936 by Surrealist artist Wolfgang Paalen. The technique involves creating patterns with the smoke and soot of a lit candle. Intrigued by Paalen's invention, fellow Surrealists such as Salvador Dali also created works of fumage, usually painting over the delicate lines of soot to complete the work.
The technique is very simple: take a thick piece of paper, board or wood. Run a candle over it until soot is deposited on the surface. Try not to burn or scorch anything.
Although the technique is simple, the set-up is a bit weird. In order to have visual and manual control of your work, you have to hold it above you. I had no idea what this meant until I saw a photograph of Diane Victor at work.
I used a piece of art bristol (the same thing as bristol board, but slightly better quality), attached to a piece of masonite with binder clips. You could use any heavy paper or bristol board, but make sure it's 100 lb. or heavier, or it will catch fire. I used 40 lb. paper for my first test piece, and set it on fire within seconds. You can also use canvas coated in gesso, or supports such as masonite, wood or fibreboard, also coated in gesso. The gesso—a plasterlike substance (don't use acrylic gesso for obvious reasons)—is primarily to help the design show more clearly.


Once you have your canvas and a place to work, light a candle and get started. The best type of candle is a slender taper of some sort. It's also a good idea to have a pillar candle or other large candle to relight your working candle if necessary. You may also want to take precautions to cover your table, porch or floor to avoid the mess of melted wax. I didn't find, however, that the wax that fell on my hand was overly hot or annoying.
If you have a big surface to play with, you can also try a "palette" of different candles, in order to experiment with various effects. I tried a smallish candle (the kind used for angel chimes) on my test piece, but found it too big for the size of paper I had, so I switched to birthday candles. These were a much better fit for me, and each of the pieces I did required exactly one birthday candle—as you'll see, I got faster as I went along.

Using your non-dominant hand to change the angle of the paper, start running the candle over the paper's surface. Depending on the weight of your canvas and its support, your hand might get tired, so it's not a bad idea to have something for it to lean on.
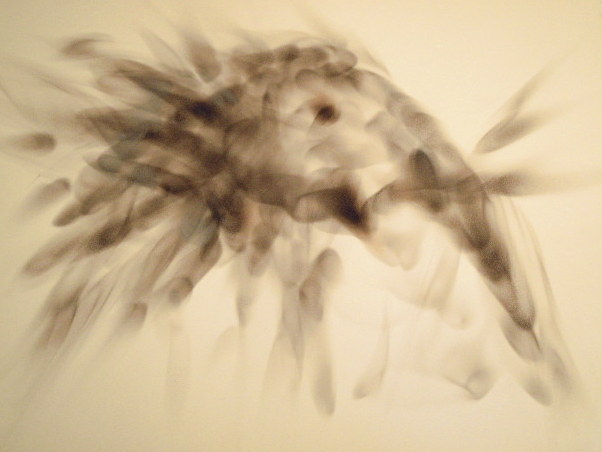
As you guide the candle and the paper, you will see dark areas of soot and smoke appearing on the paper. These were my first two attempts, which were very tentative, as you can see.


By changing the angle of paper and/or candle, you can create different effects. Changing the speed and proximity of the candle also creates interesting patterns. For example, if you move the candle fairly quickly, you'll get a soft, light grey over a large area. A longer wick gives you more delicate lines, whereas a shorter wick will give you darker and heavier areas.
These were my next few attempts. To create the eyes, I held the flame directly perpendicular to the paper. This is something you have to do very quickly, or the paper will scorch. I scorched the first of these (the baby elephant) a bit, but not enough to actually burn the paper.


In a couple of these pieces, you can see the effect of using the candle at a very acute angle to the paper. The lines will be delicate and feathery, but they will also be quite long, slithering all the way up the paper.
These are the last two I made. Something I discovered on the final piece is that, when I layered smoke on top of itself in five or six layers, the top layer went a sort of whitish ash colour (you can see it in the ear of the final elephant). It doesn't actually feel like ash, and it doesn't blow off like ash, so I'm not sure what it is. Perhaps it's some sizing or chemical in the paper leaching up. It makes for an interesting effect, but I didn't really want white to show up, so I'd probably watch out for it next time.


It's not an easy medium to control, so the results will definitely be abstract. Many artists who do fumage today add paint to their final works. The fumage creates a dreamlike image, which is then enhanced with colour in the form of oil or other paints. I might have wanted to do that if I'd created more long, feathery lines, but I didn't think paint would help any of these all that much.
Once you're happy with a fumage work, you can play with the design by smudging some of the soot with your fingers, an eraser, a brush, or even something sharper. I tried this on my test board, just to see what effect it would give, and I didn't like it all that much. Unless the area is quite dark, the soot doesn't brush off to any great extent, and smudging just seems to lighten the area without making it any more interesting. That being said, I didn't smudge anything on the elephants pictured here. What look like finger smudges on some of them are actually the work of the candle.
Unfortunately, fumage really is as ephemeral as smoke. The dark areas in particular are especially unstable. Although some recommend preserving the final result with a varnish or fixative, many artists have found that fixatives will ruin the work. I tried spraying fixative on a test piece first, and it worked okay, as long as I kept the spray really far away and sprayed a very fine mist. The fixative does seem to grab onto any thicker areas of soot, turning the area a slightly cloudy colour and beading up a little. It also appears to fade the work somewhat, which may be because a fine layer of soot is being blown away by the force of the fixative spray. And the combination of soot and fixative (even the low-odour kind) smells terrible.
A better idea might be to quickly frame anything you really like, making sure the glass doesn't smudge the work—because the least touch of anything on the darker areas will make them rub off. I learned this the hard way. Thinking it would be clever to place the finished (non-fixative) pieces between sheets of tissue paper, I was disappointed to find that the slightest touch of tissue made obvious scratches in the dark areas. The damage was already done, but I quickly sprayed them all with fixative anyway. (By the way, I discovered later that even a coating of fixative will not completely prevent the darkest areas from scratching.)
I also learned that it doesn't work if you try to go back and "re-soot" the scratched areas. Not only can you never match the original effect, but the paper has also already been somewhat compromised, and is more likely to scorch. Better to live with the scratches as an interesting effect, and/or rework them with charcoal or something. Better still to carefully photograph anything you especially like as soon as you've finished it, and keep that as your final work.
Fumage is an interesting medium to work with, although you really can't control the results to any great degree. Once you get a feel for the angle of candle to paper, and how close to get, it's fun to explore various effects. Just don't be married to a final result. And be prepared for scratches.
Elephant Lore of the Day
Elmer the Safety Elephant was an elephant character invented in Toronto, Canada in 1947. Originally created to teach schoolchildren about road safety—with slogans such as "Look both ways before crossing the street" and "Keep away from parked cars," Elmer later branched out to cover fire safety.
An elephant was chosen to represent the program because of the exceptional memory elephants were reputed to have. The program was the brainchild of Toronto mayor Robert Hood Saunders, who was inspired by a similar program in Detroit, Michigan. Within the first year of the Toronto program, collisions involving children had dropped by 44 per cent.
The first Elmer was a simple profile of an elephant, but in 1948, Saunders decided to recruit former Walt Disney animator Charles Thorson to give Elmer a new look. Thorson, who was born and raised in Winnipeg, Canada, had also designed the characters for the world's first animated feature, Snow White and the Seven Dwarfs, and is credited with designing and naming Bugs Bunny.
The new Elmer wore a sailor's hat and a bow. The Toronto Safety Council had costumes made which were worn by mascots for Elmer's many appearances in classrooms and at Saturday morning movie matinees. Elmer's fame soon spread far beyond Toronto, becoming a Canada-wide children's safety program.
 | |
| The original design for Elmer the Safety Elephant Source: http://www.canadiandesignresource.ca/officialgallery/symbols/elmer-the-safety-elephant/ |
One of the most important parts of the Elmer program was the safety flag, which flew outside schools. Schools that had gone at least 30 days without an accident caused by a student's carelessness were allowed to fly the Elmer flag on their flagpoles. This remains a part of the Elmer program to this day.
In addition to road safety, Elmer now deals with fire safety, railroad safety, Internet safety, and bullying.
 | |
| Elmer the Safety Elephant today Source: http://elmer.ca/fun-elmer/colouring.php |
To Support Elephant Welfare
World Wildlife Fund
World Society for the Protection of Animals
Elephant sanctuaries (this Wikipedia list allows you to click through to information on a number of sanctuaries around the world)
Performing Animal Welfare Society
Zoocheck
No comments:
Post a Comment