Wednesday 29 February 2012

Elephant No. 150: Music Composition


It's Leap Year Day and Giachino Rossini's 220th birthday (no, that doesn't mean he would really be 880 years old), so it seemed like a perfect opportunity to try some musical composition.

My musician and composer friends are probably going to be aghast at this little experiment, but it's something I've wanted to try for a long time.

Not that I'm any kind of composer or musician—in fact, the very idea is laughable. In elementary school, I played the violin, once actually causing my private tutor Mr. Hursti to weep in despair. In middle school, I played the clarinet in a school band that should have provided poor Mr. Smith with noise-cancelling headphones instead of a baton. By the time I hit high school, my parents had wisely decided that I was the least musical of their children, and there were no more music lessons for me.

I vaguely remember how to read sheet music, but I've never composed anything before. I'm pretty sure I'm not composing anything today, either, but at least it looks like a piece of music.

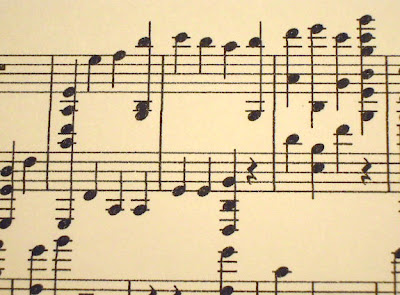
My big idea for today's elephant was to place notes in an elephant shape on a piece of stave paper, then play it through a music program on my computer.

I decided to use simple quarter notes, and a single piano as the instrument. Putting any other kind of instrument on here would be far beyond my meagre powers: not only do I not know the software, but I tend to hear only one instrument at a time in my head. Also, if I were composing this in real life, it would likely be produced on a plinky red kiddie piano like Schroeder plays in the Peanuts comic strip.


Schroeder from the Peanuts comic strip by Charles M. Schulz
Source: http://peanuts.wikia.com/wiki/Schroeder


The first thing I did was get some composition and notation software. I chose a free download from Musescore.org which seemed to have all the features I needed.

Once I had an idea of how the software worked, I laid in a general elephant outline in quarter notes. Sometimes this gave me some nice harmonies, and other times it made me cringe. I adjusted what I could, and left what I couldn't, so there are still some brief moments of horridness—in a 34-second song, perhaps not brief enough. When I tried to put in some eighth-notes and so forth, it only made me mental and looked weird, so quarter notes and a single piano is what you get.

I did adjust a few elements in the design to avoid longish rests and single notes with no harmony or chord, but I didn't go crazy.

This is what the final sheet music looked like—feel free to laugh your heads off. To be honest, I don't even know if it's readable to a real musician. Only my computer knows for sure.


And this is what it sounds like. This blogging platform doesn't seem to support music files, so I whipped this off in iMovie. I only spent about five minutes on the video, so it's nothing special.


It was a ridiculous experiment on a day that shouldn't exist, but I was really curious about what something like this would sound like. It has moments that I like, and moments that make my teeth hurt. But it was fun and took less than an hour. More to the point, the sight of elephant-shaped music made me laugh, which is always the most important thing.

Happy birthday, Mr. Rossini. You must be turning over in your grave.


Greeting card from Zazzle.com.
Source: http://www.zazzle.ca/funny_elephants_playing_music_
birthday_card-137730508120914387


Elephant Lore of the Day
For centuries, people familiar with pachyderms have noted elephants' ability to distinguish melodies—a skill that has long been used with circus elephants. In most cases, the music cues portions of the elephant's performance; however, several circuses in the middle of the nineteenth century also featured "elephant bands", which one historian suggests probably sounded "like a herd of angry Buicks".

In 1957, German scientist Bernard Rensch reported in Scientific American that his test elephant could distinguish twelve musical tones, and could remember simple melodies, even when they were played at different pitches, timbres and meters, and on different instruments. Even more astonishingly, the elephant still remembered the tunes eighteen months later.

Elephants have much keener hearing than sight, and use a vast range of vocalizations when communicating—many of which are beyond human hearing. Interestingly, they also appear to have a sense of rhythm and repetition, and even dissonance.

In 2000, Richard Lair, who had worked with elephants for more than two decades, and neurologist David Sulzer (who composes and produces as Dave Soldier), launched the Thai Elephant Orchestra. Gathering six young elephants at the Thai Elephant Conservation Center, the two men showed the elephants how to make sounds on some elephant-sized traditional instruments. These included a gong, drums, a bass, xylophones, a thundersheet and harmonicas.


Pratida is considered one of the more musically inclined elephants
in the Thai Elephant Orchestra. Here she plays the drums.
Photo: Millie Young
Source: http://www.pathtorhythm.com


Once they had shown the elephants how to use the instruments, Lair and Sulzer left the elephants to make whatever kind of music they wanted, cueing them only to start and stop. Sulzer was skeptical at first, assuming that the elephants would simply bang about on the instruments, and that the recording would have to be cleaned up in post-production. Instead, to his astonishment, the performances were recorded intact, without overdubbing, and were paused only when outside sounds intruded.

In 2003, the Thai Elephant Orchestra released its first CD on New York-based Mulatta Records. Proceeds from the CD went to a milk bank for orphaned elephants, and a training school for Thai mahouts. To see and hear the Thai Elephant Orchestra in action, click here. And for a video featuring New Age cellist Jami Sieber and her experiences with the Thai Elephant Orchestra's musicians, click here.


Elephant playing xylophone at Thai Conservation Center, Lampang, 2005.
Photo: William Albert Allard/©2008 National Geographic Society
Source: http://photography.nationalgeographic.com/photography/enlarge/
elephant-xylophone-allard_pod_image.html


Elephant's World (Thailand)

Tuesday 28 February 2012

Elephant No. 149: Milagro


I've always liked the idea and the look of milagros, so for today's elephant I thought I'd try making one out of tin.

Milagros—from milagro, the word for "surprise" or "miracle" in Spanish—are traditional folk charms used as healing and votive offerings in Latin America and European countries such as Spain and Portugal. Attached to shrines, altars and sacred objects such as statues, milagros can be purchased from street vendors, as well as in churhes and cathedrals. Milagros come in a wide variety of shapes and materials, ranging from metals such as gold, silver, tin and lead, to organic materials such as wax, wood and bone.


Collection of vintage and antique milagros.
Source: http://www.danielmitsui.com/hieronymus/index.blog/1688845/milagros/


The use of milagros likely originates among the ancient Iberians of coastal Spain—a practice that later migrated to Central and South America. Fashioned to represent whatever the petitioner is concerned about, milagros are often made in the shape of human body parts such as legs, arms, and hearts. They are also made in the shapes of animals, as a means of asking for protection or healing of pets and livestock. In addition to functioning as symbols of healing, milagros can be symbols of protection, good luck, vows and hopes. For example, a leg might represent a wish for a traveller's protection, and a house might represent a hope that the votary will soon find his or her perfect home.

Also known as ex-votos or dijes, milagros are similar to the tamata used in the Eastern Orthodox Church. Today, religious belief in the power of milagros has largely died out, and endures primarily in the cultural practices of rural Europe and Latin America. Milagros are still produced, however, and are often worn as jewellery, or carried as good luck charms, similar to a rabbit's foot or shamrock.

Most modern milagros are the size of a copper penny, although some can be as large as several centimetres across. Milagros are almost always two-dimensional low-relief designs, rather than three-dimensional objects, and if mass-produced are usually die-stamped or moulded. As objects, however, milagros have also become highly collectible, and some artists are now making beautiful hand-cut and embossed milagros to incorporate in works of art, in jewellery, and as stand-alone pieces.


Heart in Hand milagro necklace by Mary Anne Enriquez.
Source: http://www.flickr.com/photos/urbanwoodswalker/2249412746/


For today's elephant, I pulled out the roll of tin that I used for my repoussé and chasing elephant a few months ago. I cut a piece measuring about 7.5 cm (3 inches) square.


Next, I sketched a tiny elephant on a piece of paper.


I scribed the lines into the tin by laying the paper over the tin and simply tracing over it with a pencil.


Once the first faint lines were inscribed, I removed the paper, and went over the lines again, using the point of a bamboo skewer. To give the tin some room to push down, I placed it on top of a sheet of heavy cardboard, padded with four layers of paper towel.


Next, I cut the elephant out, leaving a thin margin beyond the inscribed outline. I then flipped it over, and used both ends of the bamboo skewer to give the elephant some depth.


After fiddling with it a bit to make some of the lines sharper and the embossing deeper, I filed off some of the sharp edges, and pierced the ring at the top with a tapestry needle.


I kept it small to make it similar to an actual milagro, although it's not quite the size of a penny.


This was a very easy activity, taking me about 45 minutes from start to finish. I'm happy with the final result, but would probably try to finish the edges a little better if I had more time. They would look interesting folded over with some jeweller's pliers, I think, but I also don't mind this as is. It would scratch me to bits if I were to try wearing it as jewellery, but as a little metal object, I quite like it—and, who knows, maybe it really can protect an elephant or two.


Elephant Lore of the Day
My original thought for today's elephant lore was to write something about elephants needing protection, but it's been a long day, so I thought I'd find something more lighthearted to write about.

Many stories have been told about the elephant's apparent sense of humour. One of my favourites comes from the Central Florida Zoo. In March 2010, the Asian elephant Mary died at the age of 63. When asked what he would miss most about Mary, her keeper said that he would miss her sense of humour. It seems that one of Mary's favourite tricks was coming up quietly behind a member of zoo staff and trumpeting loudly in their ear. When the startled person turned around, Mary would invariably wave her trunk and rumble at them, as though laughing.


Elephant's World (Thailand)

Monday 27 February 2012

Elephant No. 148: Tissue Paper Cutout


I came across this technique on a grade-school art website, and thought it was rather charming. Given that this is a fairly heavy work day, it seemed like the perfect activity for today's elephant.

Oddly enough, toilet paper was the precursor to wrapping tissue. Paper of various weights had been used as wrapping and padding in China since the second century B.C., but thinner paper for use in the water closet was not produced for another 800 years. Over the ensuing centuries, the use of toilet tissue fell out of favour, and wasn't truly popularized until 1857, when American inventor Joseph Gayetty developed the first commercial toilet paper.

In 1863, tailor Ebenezer Butterick, who had been using sheets of thin paper for his patterns, conceived of using similar paper as gift wrap and packaging. He and his wife produced some coloured versions of the thin, strong paper, and what we now commonly call "tissue paper" was born.

Tissue paper is produced on a machine called a "yankee dryer" that has a large steam-heated drying cylinder and a hot-air hood. The cylinder is sprayed with adhesives to make the paper stick, and pulp is passed over the cylinder, creating a thin, strong paper that holds up well when wet. Crepe paper is made on the same machine, albeit with a different type of adhesive and a "doctor blade" that scrapes the dry paper off the blade, giving crepe paper its characteristic wrinkles.


Yankee dryers in action.
Source: http://www.byronsoftware.org.uk/QA/by05001.htm


Approximately 21 million tonnes of tissue paper are produced in the world each year, six million of which are made in Europe. North America and the Far East manufacture most of the rest. North Americans are among the world's largest users of tissue paper, consuming three times as much as Europeans.


For today's elephant, I used the lesson plan from this website, which calls for a very simple process: cut tissue paper of various colours into squares; glue onto white paper or card stock; cut into shape of an elephant.


Tissue collage elephants by Grade 1 students.
Source: http://mrsbrownart.com/1st.htm


I started by pulling out a bunch of coloured tissue papers from my wrapping supplies, and cut a number of one-inch squares.


I glued these to a piece of white good-quality bristol board in a pattern that pleased me. There's no rule for this activity, other than lay down colours that you like, in a pattern that you like.

I used white glue, which I squirted onto a piece of waxed paper. I then used a flat paintbrush to coat one side of each tissue paper square I used. This was the most time-consuming part of the whole activity, but I don't think there's any other way to do it that wouldn't have made me crazy. As it was, I had to keep wiping my fingers to keep them from sticking to the tissue paper. A few times the squares stuck to my fingers so bad that they shredded when I tried to gently extricate them.


I didn't worry too much about wrinkles, but I found it best to float the tissue paper square onto the bristol board, rather than trying to lay it down. To smooth each square, I pressed it with my fingers, rather than smoothing it. Tissue paper takes moisture quite well, but it's not indestructible, and had a tendency to shred if I tried to smooth it out with my fingertips.

Layering is important to this activity, and will definitely enhance the final effect. Because of the translucency of the papers, layering creates some very interesting effects, and some pretty colour combinations.

This was the final sheet I created:


Once the layering was done and the piece had a chance to dry, I cut out an elephant shape freehand.


Because I wanted to keep this relatively simple, I cut out an ear and a tail, but nothing else.


I then simply assembled the parts. This turned out a lot better than I expected it to, and it's actually quite pretty in real life. It's very easy, if a bit messy during the gluing stage, but took under an hour in terms of cutting out the tissue squares, gluing them down, then cutting and assembling the final elephant.

I can see using this as an illustration technique, or even as a rough outline for a painting. I'm not sure I'd rush to do this again, as I hate having gluey fingers, but it's pretty enough that I'm not ruling it out.


Elephant Lore of the Day
In the Winnie the Pooh stories by A.A. Milne, Heffalumps are often mentioned, but never appear. They are believed to physically resemble elephants—and, indeed, Ernest Shepard's illustration of a Heffalump depicts an Asian elephant.

In the fifth chapter of Winnie the Pooh (1926), Piglet and Pooh try to capture a Heffalump in a trap, and in The House at Pooh Corner (1928) they actually end up falling into the Heffalump trap they'd set. Throughout the entire Winnie the Pooh cycle of books, however, no Heffalumps are ever caught, and no one ever meets one of the mysterious creatures.

The closest any of the characters comes to seeing a Heffalump is when Pooh counts Heffalumps as he tries to fall asleep. As he counts, "every Heffalump that he counted was making straight for a pot of Pooh's honey [and when] the five hundred and eighty-seven Heffalumps were licking their jaws, and saying to themselves, 'Very good honey this, I don't know when I've tasted better,' Pooh could bear it no longer."


Winnie the Pooh dreams of a Heffalump.
From Winnie the Pooh (1926) by A.A. Milne,
illustration by E.H. Shepard.
Source: http://www.returntothehundredacrewood.co.uk/winnie-the-pooh-
characters/heffalump.php


Since their appearance in Winnie the Pooh, Heffalumps have entered pop culture. In the animated adventures of Winnie the Pooh and his friends, Heffalumps are primarily rascally honey-thieves. In political journalism, the term "heffalump trap" is sometimes used to describe a trap set for a political opponent, which snags the trap-setter instead. And in Sweden, the annual Expressen's Heffalump is a literary prize awarded to the Swedish author of the year's best book for children and young adults.


Heffalump from the Disney Winnie the Pooh animated series.
Source: http://www.allthetests.com/quiz28/quiz/1294145062/Winnie-the-Pooh


Elephant's World (Thailand)

Sunday 26 February 2012

Elephant No. 147: Watercolour Wax Resist


I was looking at some grade-school art lessons today, and came across this technique, which seemed like just the thing for today's elephant.

Wax resist for watercolour works on the simple principle that wax and water don't mix. While you can overcome this to a certain extent by adding multiple layers of thick watercolour over a waxy or oily base as I did in my sgraffito experiment, the essential idea is that wax crayon or oil pastel will keep your watercolours from fully overpainting those areas.

Because the watercolour paint laps at the edges of the crayon or oil pastel, it can result in some very interesting effects, and can be as simple or as complicated as you like:

This one is from an art lesson for third-graders (age 8):


Outerspace watercolour resist drawing from a Grade 3 class, using oil pastels and
watercolour paint.
Source: http://mrsbrownart.com/3rd.htm


This one is by British artist Ingrid Sylvestre, and uses colourless wax for the resist:


Moon by the Birches by Ingrid Sylvestre, using colourless wax as a watercolour resist.
Source: http://ingridsylvestrewater-resistpaintings.blogspot.com/


And this one, from an excellent tutorial on the technique uses a combination of coloured wax crayons and colourless wax resist:


Watercolour painting with wax crayon and colourless wax resist by
Gregory Conley.
Source: http://www.watercolorpainting.com/watercolorpainting/waxresist.htm


I've only ever tried wax resist in a fabric-related context for things like batik, so I wasn't sure quite what to expect with paper. I started by drawing an elephant with oil pastels on a mid-priced sheet of watercolour paper, but the moment I painted over it, it basically disappeared.


I decided to switch to crayons, but my first attempt in crayons was also a bit of a bust. I began to realize a couple of things from these first two attempts. Firstly, I needed to apply the wax or oil pastel more forcefully, so that the paint couldn't seep in and around it. Secondly, I needed to remove some of the paint on the figural part of the piece afterwards, so that it didn't turn all murky. This is because, after the first light coat of paint, you will have deposited a thin layer of watercolour paint on top of the wax. This allows the next layer of paint to bond to that, obscuring the wax beneath.


For my third attempt, I used pink, mauve, and pale green crayons, and used a very heavy hand.


I first painted over it with a wash of orange—which looked hideous, and which I forgot to photograph in my horror—then overlaid that with a wash of black.

Next, I started removing paint from the elephant part of the painting. I had tried removing paint from my first two pieces with paper towels, but paper towels remove too much of the paint. This time, I used a wet paintbrush, gently drawing it across the wax parts of the painting. Each time I did this, I wiped the brush on a paper towel, wet the brush again, and removed more paint.

I was a lot happier with this method. You can remove as much or as little of the paint as you like, and can follow the original lines of the crayon underlay with your brushstrokes. This gives the final piece a painterly quality that I really liked. I left some of the bits where the black paint had resisted the wax, and played with the edges of the elephant to give it some dimension and texture.


If you decide to try this, here are a few tips:

1. A lighter colour of crayon is best if you plan to do a dark wash.

2. Use the crayon hard enough to create a waxy sheen.

3. If you want to produce something with a painterly quality, think of the crayon as an underlay, and think of using the watercolour as an additional medium that works with the wax layer, rather than solely as a resist.

After my first two attempts, I didn't think I was going to be able to produce anything worthwhile with this technique, but once I figured it out, the final piece took me only about half an hour from start to finish, so it's not a time-consuming activity. Despite my early misgivings, I'm very happy with the final result, and will definitely use this technique again sometime.


Elephant Lore of the Day
A great deal has been said about paintings produced by elephants, one of the criticisms being that the activity is largely guided by a mahout, or keeper. While this is certainly true of most paintings produced by elephants, it doesn't necessarily follow that the activity is inhumane.

In Thailand's elephant sanctuaries, where elephant painting is most prevalent, training is usually a cooperative and positive experience for both mahout and elephant. More to the point, the sale of paintings produced by elephants provides much-needed financial support to the sanctuaries themselves. At the first auction of elephant paintings some years ago, more than $75,000 was raised to support a number of Thailand's elephant sanctuaries.

Due to Thailand's ban on hardwood logging more than twenty years ago, as well as destruction of national habitat, the country's elephants have fallen on hard times. Not only have their numbers declined from tens of thousands to only a few thousand, but many of the remaining elephants suffer considerably from abuse and neglect. Some beg from tourists in the cities; others work in travelling circuses; and some work in black-labour industries such as illegal logging.

Given these alternatives, perhaps teaching an elephant to paint is not so bad after all.


Elephant's World (Thailand)

Saturday 25 February 2012

Elephant No. 146: Paper Weaving


Earlier this week, Frances from my fibre arts guild offered some strips of pretty green paper to anyone who wanted them. No one spoke up, so I took them, thinking I could use them to try paper weaving. I vaguely remember doing some paper weaving in nursery school, but I honestly can't remember what I made or how. Still, weaving is weaving, so I assumed that the same over-and-under technique would work with paper as well.

Although I couldn't find anything on the history of paper weaving, the technique is probably as old as paper and papyrus, which means it's been around for at least four or five millennia. Paper and papyrus are often woven to create baskets, although the most conventional use of paper weaving is in crafts and fibre arts.


For instructions on how to make this woven paper basket, click on this link.
Source: http://www.jamboree.freedom-in-education.co.uk/w%27s%20craft%20
corner/paper_woven_basket.htm


Paper weaving doesn't necessarily need to involve squared-off strips of paper. Children often learn this type of weaving with wavy strips of paper, and some paper artists weave with unusual shapes, as in the peacock basket below. Paper weaving with complicated pieces can even be used to create spheres and other dimensional objects.


Peacock basket by PaperMatrix
Source: http://papermatrix.wordpress.com/category/woven-paper-hearts/


Paper weaving with simple strips can also be quite complex. Some artists weave strips of paper through images:


Apple Weave by Dory Kanter.
Source: http://www.artworldtours.com/children.htm


 Some create patterns beyond simple one-over-one-under:


Complex patterns for paper weaving.
Source: http://www.origami-resource-center.com/weaving-patterns.html


And some make figural images:


Woven Space Invaders by Kate Lilley.
Source: http://www.minieco.co.uk/geeky-weaves/


I was happy to come across this last one, as it suddenly occurred to me that you could probably use any charted pattern to create something with paper weaving. I decided that I would make an attempt at the pattern below, which is from The Tap Dancing Lizard by Catherine Cartwright-Jones and Roy Jones. This is the same pattern I used for my Fair Isle knitting post, but this time I'm only doing the baby elephant.


The strips of paper Frances gave me were a pretty green, so I decided to consider them as a wall of green grass through which the elephant is walking. Well, that was the idea, anyway.

For the elephant itself, I decided to use a dark brownish-purple construction paper, which I cut into thin strips as well. I made sure there would be at least an inch of extra space all the way around, to help keep things from sliding out. If the strips had been wider, I would have made the margins wider as well.


Because the pattern calls for 25 "stitches" by 30 rows, I laid out 31 pieces of green paper vertically, to allow for a few extra "stitches" to bind things together. This was a mistake. It's actually easier to lay out two horizontal lines to start, and weave the vertical strips over and under those. I was already starting to hate this activity, as things showed a marked tendency to slide around and slip out of place even with a standard over-and-under pattern.


Once I had laid in three rows of one-over-one-under weaving, I began weaving the horizontal purple weft strips over and under the green warp strips, following the chart.


There were many, many points along the way where I almost gave up, crumpled this into a ball, and threw it away. This was one of the most irritating activities I've ever tried. I don't know if it was because the strips were small, but they were constantly shifting, sliding under one another, and falling off the sides and bottom. It's hard enough to follow a graphed pattern without suddenly discovering that one of the vertical strips had been hiding under the one next to it, and that you've actually gone over three rather than two vertical strips, throwing everything off.


Even when I was done, it shifted all over the place, despite the most delicate touch I could muster, and the use of tools such as bamboo skewers. I don't know how other people do this without wanting to pitch a major hissy fit. On the other hand, paper weaving is not really meant for weaving a lot of long, carrying lines, and where I went over and under more frequently, the paper locked together better.

If you try this, here are some tips:

1. Use the same kind of paper for both warp and weft. I used one slippery paper and one rough paper, and they didn't lock well together.

2. Don't use skinny strips of paper. Mine were 0.6 cm (1/4 inch) or narrower, which required a great deal of patience and dexterity.

3. Make sure the strips are fairly uniform. I thought it would be interesting if some of them were uneven, or of different widths. It isn't.

4. Don't use a design with long areas of the same colour, as this will require you to carry horizontal strips over several vertical strips, and the weave will be loose.

5. Cut your strips far longer than you think you'll need. That way, if they decide to slide around, at least they won't fall off completely.

6. Lay in at least two rows of tight over-and-under weaving top and bottom, and on both sides, to keep the design together.

7. Glue the final result to something if you want to keep it. I put the glue on the backing paper first, spread it around, then used a kitchen spatula to lift and deposit my weaving on top. While the glue was still wet, I shoved a few errant strips back into place, sandwiched the whole thing between waxed paper, and weighted it with a big book. (I photographed the final elephant before I moved it, just in case, and all photos show the unglued elephant.)

Irritation aside, I didn't hate the final result as much as I expected I would, based on level of annoyance. And it was my own fault, anyway, for breaking many of the cardinal rules of weaving. This took far too long to make, but it looks like an elephant—and now that I've glued this little sucker to a piece of paper, it's not going anywhere.


Elephant Lore of the Day
Hard to believe, but an elephant can actually fall down a well.

In February 2012, forest rangers rescued a 100 kg (220-pound) baby elephant from a well in the Dong Nai Natural and Cultural Conservation Zone in Dong Nai Province, Vietnam. With the help of local residents, heavy rope, and a lot of muscle, the rangers managed to pull the elephant out of the well, which was about two metres (6.5 feet) deep.

Similarly, in Kerala, India in 2005, local residents realized something was wrong when they heard a female elephant trumpeting in distress. They quickly discovered that a baby elephant had fallen into a covered well, and had become stuck in the muddy bottom. When attempts to winch out the elephant with ropes failed, they dug into the side of well with shovels and pulled the baby free. To see the rescue as it unfolded, click here.


Elephant's World (Thailand)