
I've been avoiding making a tie-dye t-shirt, mostly because dyeing is messy and I don't really like it. A few days ago, however, I found some inexpensive dye in a discount store, so I thought I'd finally try it for today's elephant.
Tie-dyeing is essentially a process of folding or otherwise tying up fabric into a pattern, then blocking dye from coming into contact with the fabric. The "resist" is usually string, thread or rubber bands. Once the material is dyed and/or overdyed, the binding materials are removed, and the fabric is rinsed and dried.
The earliest known examples of tie-dye date back to Pre-Columbian Peru, around A.D. 500 to 800. These first designs included lines and small circles, and involved bright colours such as red, green, yellow and blue.
 |
| Pre-Columbian pieced tie-dye—Peru, ca. 8th–9th century A.D. Source: http://sarajo.com/detail.php?product_id=893 |
The Japanese form of tie-dye, known as shibori, has been practiced since at least the eighth century A.D., involves labour-intensive techniques that include stitching, folding, and gathering material onto poles.
Tie-dye has also been used for centuries in West Africa—particularly in the indigo-dyeing regions around Kano in northern Nigeria. This tie-dyed fabric is often richly embroidered afterwards.
 |
| Bandhani fabrics from Rajasthan. Source: http://sanskrutihandlooms.com/Bandhani.aspx |
Tie-dye techniques have a long history in Indonesia as well, where the methods known as plangi and tritik are practiced. In the western state of Rajasthan in India, Bandhani fabrics are renowned for delicate patterns produced with a tie-dye technique. And in Thailand and Laos, mudmee tie-dye involves dyeing the material black first, then discharging, or removing, the colour with bleach and redyeing with various bright colours.
 |
| Mudmee tie-dye tank top. Photo: Gezi Source: http://en.wikipedia.org/wiki/File: Mudmee_tie_dye.jpg |
For today's elephant, I decided to use a couple of techniques, largely related to the stitched patterns of shibori. My plan was to stitch an elephant outline and gather it, and tie a bunch of stones with elastic bands to create circles in the background. Outside of my kanoko shibori experiment for this blog, I hadn't tie-dyed anything since I was a child, so I wasn't expecting brilliance.
I started by lightly sketching an elephant outline on the t-shirt in pencil. Next, I ran basting stitches through the design. I also added a few lines of stitching through the trunk and in the ears. I wasn't sure how well the latter would work, since they wouldn't have the additional resist of a rubber band over top, but it was worth a try.


Before gathering and binding the lines of stitching, I made an eye by tying an elastic band around the smallest pebble I could find. I then tied several pebbles into the background areas around the elephant. I added all the pebbles before binding up the elephant, because I figured it would be easier to see how the pebbles were laid out. Once the basting threads around the elephant were pulled tight, the whole t-shirt would be distorted, making it difficult to gauge spacing.


Once I thought I had enough pebbles, I pulled all the basting threads tight. I started with the threads in the trunk and ear, knotting them once they were as tight as I could get them. One helpful tip for knotting: if you put a needle into the knot before it's fully tightened, you can ease the knot along until it's tight against the folds of fabric. When you slip the needle out, the thread remains tight.


Next, I pulled all the threads outlining the elephant, knotting each when it was as tight as I could make it.

Once all the threads were knotted, I bound the gathered line around the elephant with a rubber band. This part is a bit tricky, in that you have to make sure all the gathers are pulled up, rather than hiding in gullies on the underside of the t-shirt.
Once the design is gathered, it's very hard to see the threaded outline, so this part can be a bit fiddly. If you don't do this properly, however, it can ruin your design. For example, in my design, the trunk was quite far from the elephant's head. If I hadn't carefully reined in the gathers, I would likely have ended up with a big white line across the trunk, and the trunk itself might have had no delineation at all.

Instead of squirting fibre-reactive dyes on various parts of the design, I went old-school and bought a simple packet of hot-water fabric dye. I also decided that I was going to use only one colour today, in the interests of not spending all day on this activity.

I used the stovetop method, heating the dye in a pot.

When it was simmering and I thought the dye was fully dissolved, I soaked the t-shirt in water, then dumped it in the dye. The instructions on the dye say to cook it for 20 to 30 minutes. I left it in for about 20 minutes, stirring constantly and pulling it out of the dye from time to time to check it.


When it was slightly darker than I wanted it, I pulled it out of the dye bath.

I rinsed it under cold water until the water ran clear, then removed all the rubber bands, rocks and thread. For good measure, I put it in the washing machine's rinse cycle.
I was pleasantly surprised at how well the elephant came out. Truth be told, I expected it to be a big mess. I certainly didn't expect the trunk lines to show so well, and even the lines in the ears show better than I thought they would.

I did make a bit of a mistake with the dye, in that it wasn't as fully dissolved as I had thought. There are couple of spots on the shirt where the dye is extremely dark, and a place on the front near the bottom where it's dark and a different colour. Oh well, live and learn. I'll fix it later with some fabric paint or something.
I don't love tie-dye t-shirts, but this didn't turn out too badly. It was an interesting experiment in stitched tie-dye, and wasn't as odious a procedure as I remember.
Tie-dye is still not something I see doing all that often, but I'm sure I'll try stitching a design for dyeing again—perhaps I'll even go out on a limb and try multiple colours.

Elephant Lore of the Day
A few days ago, I wrote a story about elephants having trouble crossing tea plantations. In response, one of my friends said he wished animals had a way to move freely around, while people conducted their activities in the sky or something. I thought the idea was utopian and rather sweet—but I had no idea that elephant underpasses and overpasses already exist.
Although Africa's first dedicated elephant underpass was only opened in January 2011, India and China already had similar underpasses. India even has an elephant overpass near Haridwar, allowing elephants to cross a dangerous set of railway tracks. Interestingly, when the elephant overpass was being built, the main concern was that the overpass be vibration-proof. Since elephants "hear" through their feet, an overpass with significant vibrations from rail and road traffic below would likely disturb the elephants and prevent them from using it.
The idea behind elephant overpasses and underpasses is to allow elephants to pass freely between areas that may be divided by highways and railways. Not only does this avoid human and elephant fatalities, but it also allows previously isolated populations to interact and breed, strengthening their respective gene pools.
These types of elephant roadways don't come cheap. The Kenya tunnel cost £130,000 (approximately $250,000 U.S.). Similar to a pedestrian walkway, the tunnel measures about 4.6 metres (15 feet) in height, and is wide enough for an elephants to walk comfortably without brushing up against the sides. In India, the underpass is located in the state of Assam, and features wide, open areas that allow many animals to cross at the same time.
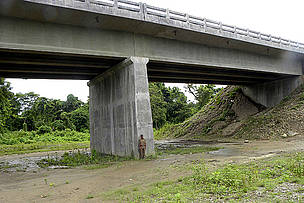 |
| Elephant underpass in Assam, 2010. Photo: Deba Dutta/WWF-India Source: http://www.wwfindia.org/about_wwf/critical_regions/north_ bank_landscape/news/?4720/elephant-movement-across-highways |
When the Kenya tunnel was built, there was some concern that elephants would never walk through a a dark tunnel built by humans, no matter how tempting it was to get to the other side. And, indeed, it did take a while for elephants to venture through.
In order to encourage elephants to use the tunnel, it was lined with hay and elephant dung. One morning, a large male elephant named Tony cautiously tried it out, followed by two other male elephants. Once through, they quickly climbed the hill on the other side, and crashed into the nearby forest. The tunnel is linked to a 14.5-kilometre (9-mile) elephant corridor on either side of the underpass, providing an added sense of security for the elephants.
Similar routes are being built around the world, including an underpass for bighorn sheep and other species in the western U.S., and an overpass for elephants in South Africa's Addo Park.
 | |
| First elephants to use Kenya underpass, 2011. Photo: ©AP Source: http://www.amusingplanet.com/2011/01/africas-first-elephant- underpass.html |
To
Support Elephant Welfare
Elephant
sanctuaries
(this Wikipedia list allows you to click through to information
on a number of
sanctuaries
around
the
world)
No comments:
Post a Comment